
Integrating Harvest to Pigment via Apple Shortcuts - Part 2
So how did I go about the technical integration of Harvest and Pigment via Apple shortcuts?
The key thing being I am developing on a Macbook. I could technically do this on my iPhone but that would require a lot more concentration, as the screen is so much smaller. I can though develop on my Macbook and then the shortcut is available across my iPhone and Apple Watch for execution as needed.
The first thing to get used to is the logical flow of Apple Shortcuts being vertical and everything is expected to be passed downwards. This is of a mind shift when you normally think of integration from other tools as horizontal and a series of left to right actions.
Lets work through this in a series of steps:
Get Harvest Timesheet data via API
Transform Harvest Timesheet data from JSON to CSV
Load CSV to Pigment
Step 1: Get Harvest Timesheet data via API
When looking for the key documentation for Harvest its best to use the official source of: https://help.getharvest.com/api-v2/
I am specifically wanting to get all historical time sheet data so I need to use the api call https://help.getharvest.com/api-v2/timesheets-api/timesheets/time-entries/
This call requires 2 parameters passed into the Header of Authorization and Harvest-Account-Id.
To create the Authorization I decided to keep it simple and use a Personal Access Token explained here: https://help.getharvest.com/api-v2/authentication-api/authentication/authentication/
To add steps to your shortcut you use the Search box on the right hand side.
I then added:
A comment section and inserted a comment “ Harvest Extract”
Then searched for Text and then set its value to be “Bearer “ plus then the Personal Access Token I created
Added a “Set Variable” and named the variable to be “vBearer” and its value to be the prior step of txtBearer
Added another text box to hold Harvest-Account-Id (which is unique to your account)
Did another Set Variable to create vAccount based off txtAccount
To issue an API call we then search for “Get Contents of” and set the url to be the API call. In this case the default of GET will be used and then we create 2 Headers where Authorization = vBearer and Harvest-Account-Id = vAccount
If we were to execute the shortcut at this stage we would then receive a result of time entries but in a JSON format.

Step 1 Integration of Harvest Timesheets to Pigment via Apple Shortcuts
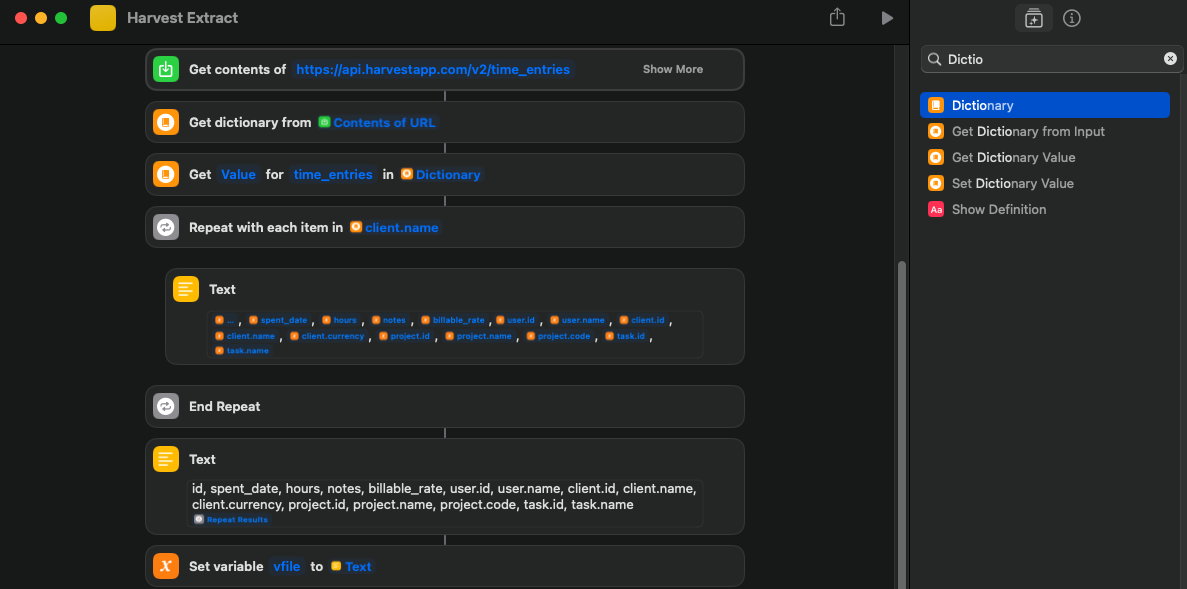
Step 2: Transform Harvest Timesheet data from JSON to CSV
Since Pigment will need a CSV file to load, we need to now convert the JSON from Step 1 to CSV.
This is the most difficult step to build as you need to be careful in your selections to create the right output.
Search for and add “Get Dictionary from” and ensure it displays “Contents of URL” which will be the prior step of the JSON time results
Search for and add “Get Dictionary Value” then set it to for “time_entries” from the prior step Dictionary. The reason we set it for “time_entries” is because that will be the root of the JSON that we see and want to capture all details below e.g. { "time_entries":[]} we want everything within the square brackets so we can loop around them
Search for and add “Repeat” and set it to loop each client.name. which is the JSON path to name property of client as clients can have multiple properties
Now the trickiest part which is adding text and then setting it to return all the properties you want from the JSON. To do this you Right Click and then from the menu select “Insert Variable” then select “Repeat Item”. Set the Type = Dictionary and Get = Dictionary and Value = the path to what you want to return. In this way we are looping the JSON and grabbing the order of values we want that will then become our CSV rows.
After the “End Repeat” add another Text and manually type out the column headers you want in the csv. This can be whatever header you want to refer to the column by in the next steps. Ensure at the end of the headers you press return and then right click and then from the menu select “Insert Variable” then select “Repeat Results”. This will now output all the results from the Loop for you below the column headers.
Next insert a “Set Variable” and have a variable called “vFile” that is set to the prior step Text
Step2 Convert JSON to CSV
Step 3: Load CSV to Pigment
By this stage the hard work is done, you have extracted all the data and converted it from JSON to CSV.
To load the csv file to Pigment we need to follow the steps here: https://community.pigment.com/importing%2Dand%2Dexporting%2Ddata%2D95/how%2Dto%2Dtrigger%2Dan%2Dimport%2Dwith%2Dapis%2D230
Add a Text and set it to be “Bearer “ and your API_KEY created within Pigment
Set a Variable vPigmentAPI to be result of that text
Add another text and set it to be the CONFIGURATION_ID of the Action Import you want the CSV file to be passed to that will do the mappings and load into your Pigment Block
Set a Variable vPigmentConfig to that text
Finally use a “Get contents of” insert the API URL of “https://pigment.app/api/import/push/csv?configurationId=“ and then at the end of the url right click and insert variable of vPigmentConfig. Ensure the Method is set to POST and add one Header where Authorization = vPigmentAPI. Change the Request Body to be of type File and for the File use the variable vFile you created
With all that setup you can hit play to see it run and when successfully loaded to Pigment you will see a return of the Config ID displayed.

Step 3 Load Harvest Timesheets to Pigment
I also then extended this out with Shortcuts Automation so it executes this Shortcut at 8am every day but that Shortcut is now available on any of my Apple devices so I can run it wherever and whenever I want.